Showing posts with label os. Show all posts

How to Customize Your OS X Dock with Themes and More


OS X lacks little in aesthetic appeal, but sometimes you just want to change it up. Luckily, a free, open source application will let you tweak the Dock’s appearance to your heart’s content.
cDock is a tiny, no-nonsense app, which doesn’t need to be installed and can be used to change your Dock in myriad ways. Take a look at the following screenshot, and you can see there’s quite a few really useful options at your disposal.
For the most part, you’ll want to use cDock to apply themes that can radically or subtly change how your dock looks. cDock comes with many themes included, or you can create your own custom themes.
For example, you can make your Dock transparent, which lets you clearly see whatever is behind it.
Or, you can make it pink! There’s really no limit because cDock has a custom option, so you can change the appearance of your Dock to really anything you desire, you can even skin it with a picture.
Many of the features found on the cDock interface, are things you could already adjust but you also have other options, such as being able to lock Dock contents so they cannot be moved for removed.
You can also add app spacers, which are essentially blank tiles, allowing you to separate apps into groups.
Doc spacers, on the other hand, allow you to space out your stacks and running apps.
You can also add a recents folder, such as here with our Recent Applications stack.
Right-clicking (if you’re of the two-button mouse persuasion) reveals options to change that recents folder to one of five different types.
You might have noticed in the earlier screenshot, the option to show only running applications. This is just what it sounds like, whatever applications are running will be the only ones that appear in the Dock.
We imagine this might useful for restraining user focus to small set of applications, or you could use it as a sort of quasi-security feature, which doesn’t mean people can’t use Spotlight to launch apps but discourages them from casually launching other apps when they’re using your computer.
Finally, the other feature we want to point out is the colored Finder sidebar (Favorites) icons option. In OS X Mavericks and Yosemite, the Favorites sidebar has monochrome icons, which are simple, unassuming, and kind of drab.
If you want to change to colored sidebar icons though, you can then customize them to your heart’s content, which is especially nice versus the plain folder icons you see in the previous screenshot.
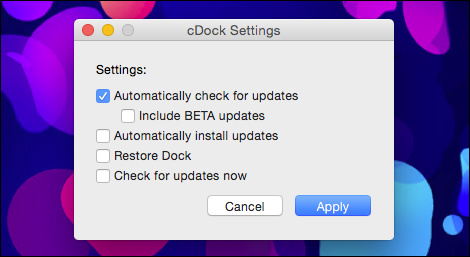
cDock has some settings, which you should be aware of, specifically the option to Restore Dock, so you can revert to your previous Dock configuration if you just want to start over. This won’t remove spacers and recents folders, but it will undo any change you made to the Dock’s overall appearance.
cDock isn’t complicated, but it does pack a lot of functionality into it. If you do decide to use it , even if it’s just occasionally, it’s good to know that once you select a change and hit “Apply,” you will have to keep relaunching the app to make further changes. It’s probably a good idea to either pin it to your Dock or keep the application package’s location accessible until you’re done making your tweaks.
Also, though cDock is up to version 6.1.1 (as of this writing), it’s still being developed, so make sure you’re always using the most recent version.
If you’re an OS X vet, then you already probably know some ways you can hack your Dock using terminal commands. The nice thing about cDock (other than being completely free), is that it eschews all that, allowing you change the Dock quickly and easily, without needing to know a thing about the command line.
We’ll be covering how to create custom Docks in an upcoming article, but in the meantime, feel free to play around with cDock on your own and see what you can come up with. And, as always, if you have anything you’d like to talk to us about, please make yourself heard in our discussion forum.

The Easiest Way to Hide Files and Folders on a Mac


Doing stuff on a Mac is supposed to be so easy and intuitive, that it’s surprising when something isn’t. There are several ways to “hide” stuff on a Mac, but only one of them really works well enough for us to recommend.
It’s not even about hiding stuff so others can’t see it. Sometimes you may simply want to hide something because you want to declutter your system. For example, if you move your Windows documents to the cloud, you will notice that many applications will often use your Documents folder for saving. Games too will often create their own folders in Documents.
The problem is that soon your Documents folder can become cluttered with all these new folders. If you’re using Windows, you can easily hide stuff using folder preferences.
With OS X, it isn’t so easy (every operating system has a way to do it), and it might not be such an issue for a lot of users, but eventually there may come a time when you can’t delete a folder or file, but you also don’t want to see it.

Command Line, Take Them Away!

To hide stuff on OS X, the best method is to use the Terminal, which can be accessed by either double-clicking it from Applications, or using Spotlight, which is ideally suited for launching apps that aren’t pinned to your Dock.
With our Terminal open, we use a single command and some dragging-and-dropping to hide whatever we want out of view.
Here’s our Documents folder on OneDrive as seen in OS X’s Finder.
You remember that earlier Windows screenshot? All we needed to do to clean up this folder was to hide everything we didn’t want to see with a simple right-click.
OS X doesn’t have that capability, and we can’t move these things because it might mess stuff up on our Windows machines because it’s synced to the cloud.
Returning to our Terminal window, we type the command “chflags hidden ” just like it is in the quotes. Make sure you add the space to the end; it’s important for what we’re about to do. Go the to the location where you want to hide stuff, hold down the “Command” key and click to select all the files and folders you want to hide. Once you’re finished, simply drag them into the Terminal window.
The command prompt will paste all the locations you just dragged behind the chflags command. Here’s an example of what that might look like. All you do now is hit “Return” and everything will disappear.
This saves you a ton of time and typing because you don’t have to enter in each location and file by hand, and you also can hide a bunch of stuff at once.
The end result is a much nicer and cleaner Documents folder, similar to what we created in Windows File Explorer.

Undoing What You Just Did

Undoing all this isn’t quite as easy, because when you open your folder, the stuff you have hidden won’t show. Again, in File Explorer, it’s a great deal easier to show hidden items.
Nevertheless, open your OS X Terminal again, but this time navigate to the root folder where all your hidden stuff resides. In our example, it’s in our Documents folder, which is on our OneDrive.
We use the change directory (cd) command where, after “cd” you’d insert the path where you want to go. Again, you don’t have to type the path, you can simply drag the location over to Terminal. Just remember to add the space after “cd. ”
Once you’ve changed directories, type the “ls” command to list everything in the directory, and then use the “chflags nohidden” command. Stuff with spaces between words is denoted with a “\” such as “Microsoft\ Hardware” or “Custom\ Office\ Templates.”
If you’ve ever used the Terminal, then you might know you don’t have to retype commands over and over. You can actually recycle command by using the up and down arrow keys. This is really convenient if you have a command or commands you need to execute over and over, but don’t want to type and type and type.
So, there you have it, hiding and unhiding folders and files in OS X. While it’s not exactly the most elegant method, it gets the job done.
Have another method or tips you would like share with us? Please, talk to us in our discussion forum.