

Previous editions of Windows allowed users to create ad hoc wireless connections between computers. You could use those connections to create a wireless network between multiple computers or to share the Internet connection that was available on one of them. This can no longer be done in Windows 8.1, at least not using a visual interface and the mouse. However, with the help of the Command Prompt and a few commands, you too can turn your Windows 8.1 laptop or hybrid device into a WiFi access point. Here's how:
NOTE: Lots of readers have asked us for a way to automate the steps described in this tutorial. That is why we have updated the tutorial and created a small program, which aims to automate the steps involved in this process, as much as possible. You can find more information and the download link at the end of the article. However, we do recommend that you read the whole article before using our program, so that you understand how to use it.
What You Need In Order For This To Work
In order to use your Windows 8.1 laptop or hybrid device as an WiFi access point for other devices, it must have at least 2 network cards installed and one of them must be a wireless network card. One of them must be connected to the Internet.
Setup scenarios we tested that worked great include:
- One laptop using its Ethernet connection for Internet access and its WiFi adapter to broadcast - use a network cable to connect your Windows 8, 8.1, 10 laptop to the Internet and the wireless network card for the access point that's sharing the Internet access with other devices.
- One laptop that is connected to the Internet through a USB mobile modem and broadcasts the wireless network through its WiFi adapter - many users will have a USB mobile modem available with 3G or 4G connectivity. They can use it for Internet access and use the wireless network adapter for creating the access point and sharing the Internet access with others.
- One laptop and two wireless network adapters, one connected to the Internet and the other acting as an access point - you won’t find this situation too often, as laptops and hybrid devices don't come with two wireless network cards installed. However, you can install a USB wireless adapter and use it for creating the access point.
Step 1. Create A Virtual WiFi Network in Windows 8, 8.1, 10
To begin, we'll need to open the Command Prompt with administrative privileges and use a command to create a virtual wireless network that is broadcasted by your Windows 8, 8.1, 10 device.

To show you how this is done, we will create a wireless network called Hotspot. The password for this network will be "Allsoftlearn".
Inside the Command Prompt window, type the following command:
netsh wlan set hostednetwork mode=allow ssid=Hotspot key=Allsoftlearn
Notice that the name of the network is set using the SSID parameter and the password is set using the KEY parameter. Obviously, you can set your own values for them.
To create the access point, press Enter. If all goes well, you should see that the hosted network has been set.

Now you have created a virtual adapter that can function as a wireless access point for other computers and devices in your area. However, in order for it to work, you need to take one more step: turn on this virtual adapter.
Do not close the Command Prompt. Keep it open and enter the following command:
netsh wlan start hostednetwork
Then, press Enter.
The virtual wireless adapter is now started and shown in the Network and Sharing Center.

You can connect all your devices to the newly created wireless network. However, it has no Internet access. If you stop at this point, when you connect other devices and computers to the newly created access point, you can create a network between them and use it to share files and resources.
Step 2. Allow Internet Access For The Devices That Are Connected To The Virtual WiFi Network
Open the Network and Sharing Center. Notice that the virtual network adapter you just created is displayed as active, but it has no Internet access at this time.

Click or tap the connection of the physical network adapter that currently has Internet access. In our case, it is an Ethernet connection.

This opens the Status window for the selected network adapter. Click or tap Properties.

In the Properties window, go to the Sharing tab.

In order to give Internet access to the virtual WiFi adapter that was created earlier, check the box near "Allow other network users to connect through this computer's Internet connection".
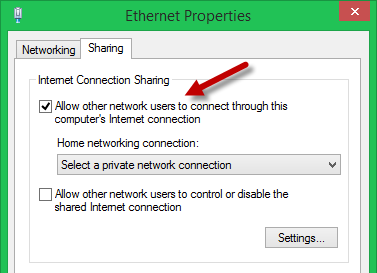
Then, select the virtual adapter that was created earlier.

Click or tap OK and Close to save the settings you've made.
Go back to the Network and Sharing Center and you will notice that the virtual network adapter now has Internet access.

The virtual adapter now gives Internet access to all the devices that are connected to it.


No comments:
Post a Comment