Showing posts with label Ipad. Show all posts

How to Tame (and Improve) the iPhone’s Autocorrect Feature


Autocorrect is a really handy tool for those moments when you whiff the spelling of a complex word or transpose the letters in a simple one, but autocorrect errors can be extremely frustrating and the system isn’t without shortcomings. Read on as we show you how to whip your iPhone’s autocorrect system into shape (and teach it a new trick or two at the same time).

Why Do I Want To Do This?

When the autocorrect system in iOS is at the top of its game, it works beautifully and saves you from sending out texts with misspelled words. When you type “youre” it corrects to “you’re”, when you type “fihs” it corrects to “fish”; those and thousands of other slips-of-the-finger are all quickly and efficiently corrected so no one is the wiser to your punctuation and spelling follies.
When it’s malfunctioning or overly aggressive in its treatment of your text shorthand, slang, or even names it doesn’t recognize, it can get ugly fast. Your coworker’s uniquely spelled name becomes the name of a common household object. Your message goes from mundane to a triple entendre with a single flipped word. In fact there are entire websites, like the popular site Damn You Autocorrect, devoted to cataloging the mishaps and funny comments that result from overzealous text autocorrection.
Just because autocorrect is misbehaving, however, doesn’t mean you need to shut the whole system down. We’ve gathered together multiple tips and tricks here to help you wrestle your iPhone’s autocorrect system into shape.
Note: If you’re an Android user who wants to achieve the same ends for their Android phone, be sure to check out our similar article geared toward the Android OS here.

Add (And Remove) Autocorrect Entries

The best defense in autocorrection wrangling is a good offense. And the best offense when it comes to dealing with autocorrect is to aggressively manage the suggestions autocorrect throws at you. When the iPhone predictive text engine/autocorrect system latches onto a word it can be difficult (but not usually impossible) to get it to let go. It’s much easier to set it on the right path from the start.
Let’s say, for example, you want to teach autocorrect to accept the word “floofy”. This is not a dictionary approved word but a slang term that means very light, fluffy, or airy, and as such it’s a perfect way to demonstrate how autocorrect learns (and can unlearn) a word.  Let’s look at how autocorrect treats “floofy” if we actually made a typo versus if we wanted to teach autocorrect to accept it.
When you type the word “floofy” autocorrect assumes that you didn’t mean floofy but a similarly worded word like “floods”, as seen in the predictive text bar above. If you didn’t meant to type “floofy” and you really wanted to type “floods” then hit the spacebar and it will automatically correct the word to the best alternative in its dictionary (the best choice is always the center word in the suggestion bar).
If you did mean to type “floofy” you can select the quoted word “floofy”, as seen to the far left, in the suggestion bar above. This instructs the autocorrect system that you want the word (regardless of its dictionary status). Once you select the quoted text autocorrect will stop switching “floofy” to “floods”.
Don’t worry, if you accidentally add a word you don’t want to add, you can correct it in one of two ways. You can click on the word (as seen in the screenshot above) to prompt an alternative selection or you can backspace the entire word out and start again. After you’ve overwritten an entry a few times with the correct spelling autocorrect should accept the new spelling.
If for some reason selecting the alternative text or backspacing over the text to replace it with the correct spelling doesn’t fix your problem, you can use the trick in the next section to override autocorrect.

Add Shortcuts

Another clever trick to manipulate autocorrect (and to save yourself from typing long names or phrase too) is to take advantage of the shortcut function. The shortcut system could also be called a substitution system because the phone automatically substitutes the target word or phrase for the shortcut whenever you type it out.
Let’s say, for example, we wanted our iPhone to always type out the formal name of How-To Geek when we were texting but we didn’t actually want the hassle of writing three words, capitalizing them, and including the hyphen every single time. To that end we can create a simple substitution wherein “htg” is automatically substituted with “How-To Geek”.
Navigate to Settings -> General -> Keyboard on your iOS device and then select the Shortcuts entry.
By default iOS has one example shortcut “omw” for “On my way!” It’s easy enough to add another (or hundreds more depending on how motivated you are) by simply tapping on the + symbol in the upper right corner.

There you simply enter the phrase you want the shortcut to expand into (in this case “Allsoftlearn”) followed by the shortcut to trigger it (in this case “htg”).
Now when we type “htg” (seen above) on our iPhone it automatically expands into “Allsoftlearn” as soon as we hit the spacebar after the shortcut is entered (seen below).
Making life easy with text-expansion shortcuts isn’t the only thing you can do with the handy shortcut system. You can also use it to overrule autocorrect errors. Sometimes it becomes impossible (or nearly impossible) to overrule an autocorrect error despite your best efforts (such as force correcting autocorrect as we highlighted in the previous section of this article). In such cases you can overrule autocorrect with a shortcut entry. Let’s say, for example, you misspelled a common (but in your defense tricky!) word so many times that it screwed up the autocorrect entry and autocorrect now believes your misspelling is the right one.
If it’s only a problem with a few words you can easily create a shortcut entry to fix your autocorrect flub. If you mispelled anonymous wrong so many times that it now thinks the correct spelling is “anonamous” you just need to make a shortcut entry where the phrase is the correct spelling “anonymous” and the shortcut is also the correct spelling “anonymous”. Now when you type the word correctly, “anonymous”, despite the autocorrect entry being off the shortcuts menu will take precedence over the autocorrect entry and the word will be spelled as you entered it in the shortcut menu.
On a lighter note, the shortcuts menu is also a great way to prank somebody without actually screwing up their autocorrect system and in-phone dictionary. Let’s say you wanted to prank a coworker to have your boss’s name substitute out for another phrase. You could create an entry on your coworker’s phone for a shortcut that swaps “Steve”, the name of your boss, with “Sweetie”. Whether hilarity or an HR writeup would ensue is a matter of corporate climate and we’d advise you to use your new found powers wisely.

Add Unique Names To Your Contacts

Another area autocorrect struggles with is unique names. My name, Jason, is a very common Western name that autocorrect doesn’t even blink at. But what about the Jasyns of the world? While their parents might have liked the alternative spelling of Jason, the autocorrect editors of the world certainly don’t.
If you frequently text or email a person with a unique name or one that is not spelled in the conventional fashion autocorrect expects you could use the tricks in the two previous sections to teach autocorrect how to spell their name, but the most time-efficient way to deal with the specific problem of unique names is to simply create a contact for that person in your address book.
Autocorrect uses the name list in your address book as a reference presuming, correctly so, that you maintain contact with the people on that list and it should respect the spelling of their names. Even if you don’t plan on having direct contact with the person in question (let’s say you want autocorrect to respect the nickname spelling you use for a friend or your child) you can create an empty contact entry with just the (nick)name of the person in question, as seen in the screenshot above. Tap on the Phone icon, then Contacts -> + to add a new contact and trick autocorrect into respecting the spelling of their name.

Reset The Dictionary

If you’ve done your best to undo your autocorrect missteps using the tricks outlined above regarding setting (and overwriting) autocorrect entries but you just can’t seem to get the changes to stick, the final step to wiping the autocorrect slate clean is to reset the keyboard dictionary.
Navigate to Settings -> General -> Reset and tap on “Reset Keyboard Dictionary”. Tread carefully in this screen as it includes not only a link to reset the keyboard dictionary but links to reset your network settings, phone contents, and other significant parts of your phone. Confirm you want to reset the dictionary and it will be wiped back to the factory defaults.
This will erase any and all modifications you have made to the keyboard (like when we trained the dictionary to accept “floofy” in the first section) but it will not erase any shortcuts you created or contact list entry name/nicknames.

Disable Autocorrect (And Other Keyboard Tweaks)

If you’ve done your best to wrangle autocorrect and you’re just fed up with the whole affair you can, rather easily, completely disable it. To disable autocorrect navigate to Settings -> General -> Keyboard on your iOS device.
Under the Keyboard menu simply untick “Auto-Correction” and you’re done.

How To Use Samsung Smart View with Your iPhone/iPad

Samsung Smart View is a free application that turns your iPhone or iPad into a remote control for Samsung Smart TVs. In order to use this application, all that is required is that both devices be connected to the same local network. 

Control Your Samsung Smart TV with Your iPhone/iPad

Download Samsung Smart View from the Apple Store: 


Once downloaded, you will be able to change channels and control your television volume from your iPhone. You can even browse through Smart Hub applications and input text via the iPhone's virtual keyboard.

How to Prevent Safari from Opening Downloaded Files

Safari automatically opens downloaded files it considers as Safe. It may include compressed files, PDF, pictures, videos and other type of files downloaded from trusted sources. But what if a virus or malware was hidden in one of these so-called safe files? You might want to turn off this feature (enabled by default) for your own good. 

Method 1 - From Safari's settings

Launch Safari, click on the Safari menu > Preferences. Go to the General tab and clear the Open "safe" files after downloading checkbox. 

Method 2 - Using the terminal

Open a terminal and run the following command: defaults write com.apple.Safari AutoOpenSafeDownloads -boolean NO

Make Screencast Movies of your iPhone or iPad with QuickTime

Did you know that your Mac ships with a screencasting software that can be used for quickly recording movies of your computer screen? You can record the microphone audio along with the video, there’s an option to show or hide the mouse clicks during the screen recording and the movies can be exported in HD formats. This very-capable app is called QuickTime Player.

And it just got better. If you have upgraded your Mac to OS X Yosemite, you can use the same QuickTime Player software to record the screen of your iOS device in 2 easy steps. All you need is an iPhone or iPad running iOS 8 and a Lightning to USB cable – it is the same cable that you are currently using to connect your iOS device to the computer or the charger.


QuickTime as an iOS Screen Recorder

Step 1: Connect the iPhone to the computer through the 8-pin Lightning to USB cable. This will not work with older iOS devices that use the 30-pin connector.
Step 2: Open the QuickTime Player on your Mac (Yosemite) and choose “New Movie Recording” from the File menu  
. If you are to record screencasts of your desktop, choose the “New Screen Recording” option.
Step 3: Click the arrow near the red record button and choose iPhone or iPad as the source camera. You can also select your device name in the Microphone section to record any audio coming out of your iOS device.
Once you are done recording the iOS screen, you can use the File -> Export menu in the QuickTime Player to save the movie in .mov format at 720p or 1080p resolution that can be uploaded to YouTube without conversion.

iOS Screencasting without the Mac

The iOS screencasting feature is only available with QuickTime on Mac OS X Yosemite and requires a relatively newer device running iOS 8 or later.
If you are however using Windows, or running an older version of Mac OS X, you can still record iOS screencasts with the help of apps like AirServer, Reflector orX-Mirage. AirPlay is built into iOS and Mac OS X and these apps use the the same AirPlay technology to mirror anything on your iOS screen to your Mac or Windows computer over a wireless local network. No cables required.

How to Recover a Forgotten Wi-Fi Password in OS X


If you’ve completely forgotten the Wi-Fi password, you can usually just read it from the sticker on the router provided by your ISP — but what if that isn’t the right one? You can also recover your Wi-Fi password from your Mac.

Of course, you could also go through the router interface to just change the password, assuming you haven’t forgotten your router password as well. And if you are running Windows or Android you can find your forgotten password easily there as well.
But today it’s all about OS X, and you can easily recover your wireless password from your Mac.

Recovering the Wi-Fi Password

Pull up Spotlight with a quick CMD + SPACE shortcut key combination, and then type in Keychain to launch the Keychain Access utility. Browse down into System, and then find your Wi-Fi network name in the list.
Once you’ve found that, simply right-click on the item in the list, and select “Copy Password to Clipboard.”
You’ll be prompted twice probably to enter your password, and the second time, you’ll have to also type your username — normally your full name — and the password.
Once you’ve done that, the password will be on your clipboard, and you can paste it into another window to actually see it.
If you wanted to see the password, maybe to enter it on another device, you can double-click on the entry in the list, and check the Show password box, which will prompt you multiple times for a password.
You can simply read the password in plain text at that point.

Camtasia Studio Tutorials Available on your iPad


TechSmith has released a new iPad app called Fast Track that will help you learn the Camtasia Stuidio program at your leisure on your iPad.
The app has a collection of video tutorials, or screencasts, that cover almost every feature of the Camtasia screencasting program and whether you use Camtasia for screen recording or for recording PowerPoint presentations, you may learn something new through these tutorials. All videos tutorials have text transcripts as well though they are only available in the portrait mode.
TechSmith’s YouTube Channel (@ChannelTechSmith) also contains a good collection of screencasting related tutorials but the advantage with the new Fast Track app is that it also works offline – you don’t need an Internet connection to watch any of the tutorials. And it’s free.
I think, going forward, TechSmith will extend this app beyond Camtasia Studio and include tutorials for other products as well including SnagIt, Jing and Camtasia for Mac.

How to Make Text Larger and More Readable on iPhone or iPad


Apple continues to produce mobile devices with incredible screen resolution and clarity. Retina display or not, however, even if on-screen text is sharp enough to rival print, it makes little difference if you can’t read it.
Super tiny screen text is all the rage these days, and just as Android’s text can be upsized, so too can iOS’s. In fact, while Android’s solution is basically large or nothing, Apple’s solution is quite a bit more elegant and nuanced.

Display Text Size

The quickest way to simply resize your device’s text is to open your iPad or iPhone’s Settings and tap, “Display & Brightness” and then tap, “Text Size.”

The default setting is right in the middle, but you have six other sizes to choose from.
Here’s what the largest sized text looks like, which quite a bit more prominent.
Of course, if you’re an eagle-eyed, carrot-eating, bionic-vision type, then you can drag the slider all the way to the left for the smallest type. The smaller the text, the more that will fit on the screen, and vice-versa.
Recall the Display & Brightness settings had a Bold Text setting.
If you want to turn on bold text, you will need to restart your device.
Here’s the results when we use the largest size with bold enabled. While the headings and clock don’t necessarily appear larger along with the settings, the bolded text gives everything greater contrast.
Don’t forget that along with the Display & Brightness settings, you can also pinch-zoom in many applications.

More Options in Accessibility

If you tap “General” and then “Accessibility,” you’re treated to quite a few more options that deal primarily making iOS easier to use, such as if you have problems with your vision or need corrective lenses. Many of these are fairly easy to reason out, VoiceOver, for example, speaks items on the screen when you tap on them, while Speech reads screen text aloud.
Zoom is a bit more immediately useful for enlarging text. When turned on, you zoom the screen when you double-tap with three fingers. You can drag the selection square (its zooming effect doesn’t appear in the screenshot), like a magnifying glass.
If you scroll further down the accessibility settings, there’s a few more text-related controls.
Most notably, the Larger Text options, while strikingly similar to the Large Text options in the previous section, take things a bit further by allowing you to access even larger text sizes.
Another trick you can enable is the Button Shapes setting, which doesn’t necessarily make buttons more readable, but easier to see.
Finally, tap the “Increase Contrast” to access options, such as to reduce transparencies, which increases text legibility; Darken Colors, and the Reduce White Point feature, which lowers the display temperature so bright colors don’t appear so intense.
It’s a good idea to play around with all these options to see what combination works for you. Clearly Apple has designed these accessibility options with the philosophy that one size does not fit all.
Beyond making text larger and more readable, there’s quite a bit more to the accessibility options, such as subtitles, hearing aids, guided access, and more. You’re encouraged to explore them to see if they offer anything to make your iOS user experience easier and more enjoyable.
Please take a moment or two to let us know if these tips helped you out. Lend your questions and comments in our discussion forum.

How to Make Phone Calls from your iPad

The iPad may look like an oversized iPhone except that it cannot make or receive phone calls. There are however apps, both free and paid, that can turn your iPad into a phone, sort of.

For instance, there’s Skype that lets you make voice and video calls calls to other Skype Fring and Truephone that you may use to call any landline or mobile number from the iPad over Wi-Fi or 3G.


users anywhere in the world for free. Then there are apps like
Another option is Line2 that practically converts your iPad into an iPhone for a monthly fee. You can make phone calls, send text messages and the app runs in the background so you can even receive phone calls while not using the app.


Turn your iPad into an iPhone

The various apps that I have mentioned above use VoIP calling but wouldn’t it be cool if you could use the SIM card of your own mobile phone to make calls from the iPad without changing the number.
There’s a new Cydia app in town called PhoneIt-iPad that does exactly that. It can turn an iPad 3G into an iPhone allowing you to make or receive phone calls and text messages. The app is expensive at $19.99 and it works only on jailbroken iPad 1 running iOS 4.3.3 and not the newer iPad 2.
Here’s a video of the PhoneItiPad app in action:

How to Train Siri, Cortana, and Google to Understand Your Voice Better


No two people sound exactly alike. Different people have different accents and ways of pronouncing words, and computer voice recognition systems like Siri, Cortana, and Google’s voice search aren’t as good as actual human beings at understanding every voice. Train your voice assistant and it’ll be better at understanding you.

Traditionally, computerized voice recognition systems have required some training before they understood you. Modern voice assistants are designed to “just work,” but you can still make them recognize the words you say more often by training them.


Siri on IOS 9.1

Apple added some voice training features to Siri in iOS 9. Activate the “Hey Siri” feature — which allows you to say “Hey Siri” and start talking to Siri from anywhere — and you’ll be prompted to perform some voice training.

(On most iPhones, this only works while your screen is on or while your phone is plugged in. If you have an iPhone 6s, you can also say “Hey Siri” while your screen is off to start a voice search.)

To activate this feature, open the Settings app on your iPhone or iPad, tap the “General” category, and tap “Siri.” Activate the “Allow “Hey Siri”” option and you’ll be prompted to train Siri.

Siri will have you say “Hey Siri”, “Hey Siri, how’s the weather today?”, and “Hey Siri, it’s me.” This will improve Siri’s ability to understand you.


Cortana on Windows 10

Cortana includes a voice-training feature so you can help Cortana understand your voice better. Like Google, Cortana will upload your voice activity and store it to help Cortana learn your voice over time and understand you better — that’s what the “Speech, inking, & typing” privacy setting controls. You could disable it and tell Cortana to “Stop getting to know me,” but then it would have a harder time understanding you.

To start training Cortana, click or tap the Cortana bar on the taskbar, click the “Notebook” icon at the left of the Cortana pane, and select “Settings.” Activate the “Let Cortana respond to “Hey Cortana” option and then click the “Learn my voice” button. Cortana will walk you through saying a variety of phrases to learn your voice. All of these are things you can actually do with Cortana

.


Google on Android, Chrome, and Elsewhere

Google doesn’t include a special training process on Android. However, some manufacturers do offer this feature on their devices. For example, the Moto Voice application on Motorola phones will prompt you to train it by saying several things the first time you open the Moto Voice app.

Instead, Google captures and keeps all the voice searches, voice actions, and voice dictation activities you perform on your phone. It stores this with your “Voice and Audio Activity,” which is tied to your Google account and used on Android, in Chrome, and in Google’s apps on iOS. You’re free to delete or halt collection of this information at any time, but leaving it enabled means Google will learn how to recognize your voice and the way you pronounce words over time.

To choose whether or not your Android device reports this information, use the “Activity controls” pane in the Google Settings app.


None of these training processes are mandatory, but they’ll help the service in question understand you better. If you find yourself annoyed that your phone, tablet, or computer doesn’t understand you as well as it should, it may just need some training.

Other similar programs — for example, speech-to-text programs — generally have their own integrated training features, too. For example, the Speech Recognition feature that’s been part of Windows for years can be trained to work better.

How To Turn Your Windows 8, 8.1, 10 Device Into A WiFi Access Point

Previous editions of Windows allowed users to create ad hoc wireless connections between computers. You could use those connections to create a wireless network between multiple computers or to share the Internet connection that was available on one of them. This can no longer be done in Windows 8.1, at least not using a visual interface and the mouse. However, with the help of the Command Prompt and a few commands, you too can turn your Windows 8.1 laptop or hybrid device into a WiFi access point. Here's how:
NOTE: Lots of readers have asked us for a way to automate the steps described in this tutorial. That is why we have updated the tutorial and created a small program, which aims to automate the steps involved in this process, as much as possible. You can find more information and the download link at the end of the article. However, we do recommend that you read the whole article before using our program, so that you understand how to use it.

What You Need In Order For This To Work

In order to use your Windows 8.1 laptop or hybrid device as an WiFi access point for other devices, it must have at least 2 network cards installed and one of them must be a wireless network card. One of them must be connected to the Internet.
Setup scenarios we tested that worked great include:
  • One laptop using its Ethernet connection for Internet access and its WiFi adapter to broadcast - use a network cable to connect your Windows  8, 8.1, 10  laptop to the Internet and the wireless network card for the access point that's sharing the Internet access with other devices.
  • One laptop that is connected to the Internet through a USB mobile modem and broadcasts the wireless network through its WiFi adapter - many users will have a USB mobile modem available with 3G or 4G connectivity. They can use it for Internet access and use the wireless network adapter for creating the access point and sharing the Internet access with others.
  • One laptop and two wireless network adapters, one connected to the Internet and the other acting as an access point - you won’t find this situation too often, as laptops and hybrid devices don't come with two wireless network cards installed. However, you can install a USB wireless adapter and use it for creating the access point.

Step 1. Create A Virtual WiFi Network in Windows  8, 8.1, 10 

To begin, we'll need to open the Command Prompt with administrative privileges and use a command to create a virtual wireless network that is broadcasted by your Windows 8, 8.1, 10  device.
To show you how this is done, we will create a wireless network called Hotspot. The password for this network will be "Allsoftlearn".
Inside the Command Prompt window, type the following command:
netsh wlan set hostednetwork mode=allow ssid=Hotspot key=Allsoftlearn
Notice that the name of the network is set using the SSID parameter and the password is set using the KEY parameter. Obviously, you can set your own values for them.
To create the access point, press Enter. If all goes well, you should see that the hosted network has been set.
Now you have created a virtual adapter that can function as a wireless access point for other computers and devices in your area. However, in order for it to work, you need to take one more step: turn on this virtual adapter.
Do not close the Command Prompt. Keep it open and enter the following command:
netsh wlan start hostednetwork
Then, press Enter.
The virtual wireless adapter is now started and shown in the Network and Sharing Center.
You can connect all your devices to the newly created wireless network. However, it has no Internet access. If you stop at this point, when you connect other devices and computers to the newly created access point, you can create a network between them and use it to share files and resources.

Step 2. Allow Internet Access For The Devices That Are Connected To The Virtual WiFi Network

Open the Network and Sharing Center. Notice that the virtual network adapter you just created is displayed as active, but it has no Internet access at this time.
Click or tap the connection of the physical network adapter that currently has Internet access. In our case, it is an Ethernet connection.
This opens the Status window for the selected network adapter. Click or tap Properties.

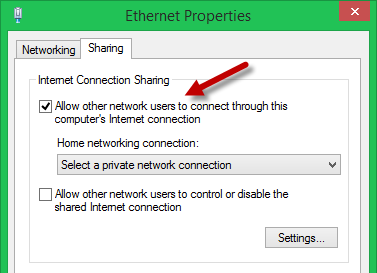
In the Properties window, go to the Sharing tab.


In order to give Internet access to the virtual WiFi adapter that was created earlier, check the box near "Allow other network users to connect through this computer's Internet connection".


Then, select the virtual adapter that was created earlier.


Click or tap OK and Close to save the settings you've made.
Go back to the Network and Sharing Center and you will notice that the virtual network adapter now has Internet access.

The virtual adapter now gives Internet access to all the devices that are connected to it.