Showing posts with label mac. Show all posts

Download Mac Updates Once and Install on Multiple Computers

Mac OS X updates are huge with the installation files running into several gigabytes. The same is true for Mac apps like iMovie or Microsoft Office that have massive installers. The problem is compounded when you own multiple Mac computers and you need to upgrade them all to the latest OS X update. It will not just take too much time but you may end up consuming your monthly download bandwidth


A simple and obvious workaround to the problem is that you download the installer files on one Mac machine and then transfer the downloaded apps to all your other systems through AirDrop or WiFi. The Apple website says that “Apps [downloaded] from the Mac App Store may be used on any Macs that you own or control for your personal use.” This is however easier said than done.

Install Mac OS X Updates on Multiple Macs

You download a 5 GB Mac OS X installer from the App Store, the machine restarts, your system is upgraded to Mac OS X Yosemite or El Capitan but wait, where has the installer disappeared? Your Mac, in a bid to save space, deletes the original installer automatically after the upgrade and thus you cannot reuse it on other machines.
To get around the problem, after the installer has downloaded, quit the installation routine and do not restart the machine. Go to the ~/Applications folder on your Mac, find the installer file and Option+Drag it to another folder like ~/Downloads to make a copy that will stay even after the machine is restarted.
For minor updates, like OS X 10.10.8 or 10.10.9 updates, Apple releases standalone installers as .dmg files that you can download once and install on multiple machines. The releases are available as incremental updates (containing only changed files) or combo updates (all changed files since the last major release).
A simple Google search for “download mac ox x 10.10. combo” will reveal the direct download links for the .dmg files on the Apple support website.


Install Mac Apps from the App Store

In the case of apps downloaded from the Mac App Store, you’ll find the .app files in your /Applications or /Users/username/Applications folder that you can easily copy to your other Mac machines. Internally though, the App Store downloads the installer as a package file (with a .pkg extension) and this will not reside in the Applications folder but in a separate hidden folder.
You can grab these Installer Package files and install the same Mac app on other machines without having to download it again thus saving data. To get started, open terminal on your Mac and run the following command to know where the App Store has downloaded the installer files:
defaults write com.apple.appstore ShowDebugMenu -bool true

Now open the Mac App Store app and you’ll see a new Debug menu (see screenshot). Click the “Show Download Folder” menu and it will open the location of the download folder inside Finder where the Mac apps are temporarily download. You can find the .pkg files inside one of the sub folders that you copy to your other Mac systems via Airdrop.
[Bonus Tip] If you are upgrading to a new version of Mac OS X, like the upcoming El Capitan, press Cmd+L at the installation screen and it will open the installation log so you know what’s exactly happening behind the scene.

How To Create a Bootable USB Installer for OS X El Capitan

This procedure explains how to create an installation key for Mac OS X El Capitan using a USB key. This method will work for OS X El Capitan, Yosemite, Mavericks, and Mountain Lion updates. 

How To Make an El Capitan Install Drive with a USB


El Capitan Information Pages on Apple.com

Before beginning, you may want to familiarize yourself with the upgrade process, and hardware requirements necessary for the El Capitan installation. 

Pre-Requisites for the El Capitan Update

There are several prerequisites necessary for a successful installment of El Capitan. A list of requirements for the compatible models can be found below.

Compatible Macs

MacBook (released early 2015), MacBook (aluminum series released late 2008 - early 2009 or later), 
MacBook Pro (released mid/late 2007 or newer models), 
MacBook Air (released late 2008 or newer models), 
Mac Mini (released early 2009 or newer models), 
Mac (released mid 2007 or newer models), 
Mac Pro (released early 2008 or newer), 
Xserve (released early 2009). 

Requirements

OS X 10.6.8 or later, 2GB of RAM (minimum), 
8GB of storage space, 
Some features require an Apple ID, 
Some features require a compatible Internet service provider; extra charges may apply. 

STEP 1: Download El Capitan

Launch the Apple App Store, and sign-in using your iCloud account. Click on OS X El Capitan >Download to begin the download process. The El Capitan download will utilize about 6GB of space. 

Once the installation package has been downloaded, it will launch automatically. Do not click onContinue. 

You may quit the installation by clicking on the Install OS X menu > Quit Install OS X. Leave the installation package (Install OS X El Capitan) in the Applications folder, and proceed to the next step. 

STEP 2: Prepare the USB Installation

You will need a blank 8GB USB key. Connect the USB key to your Mac and launch the Disk Utilitylocated in Applications > Utilities. Select your USB drive (not its existing partition, but the physical key itself). Click on Partition Layout and select 1 partition. Next, select the Optionbutton, making sure that GUID Partition Table is selected. Click OK. 

Select Mac OS Extended (Journaled) as the default format for the drive. Rename your USB key to something more significant (e.g. elcapitan) and make a note of it somewhere. You will need the exact name for a terminal command in STEP 3. 

Click on Apply > OK. 

STEP 3: Creating the Installation Key

Launch the Terminal application located in Applications > Utilities and type the below command: 

sudo /Applications/Install\ OS\ X\ El\ Capitan.app/Contents/Resources/createinstallmedia --volume /Volumes/e/name_of_USB --applicationpath /Applications/Install\ OS\ X\ El\ Capitan.app --nointeraction 

Replace name_of_USB with the name you have chosen for your USB key. 

Confirm with the Enter key, and type your administrator password when prompted. Let the process unfold until the Terminal window says Done. 

Your OS X El Capitan installation USB key is now ready. 

Updating from OS X Snow Leopard and Leopard

Additional steps are required when updating from Snow Leopard (Mac OS X 10.6.x). 

Click on the Apple menu > Update software. Update to Mac OS X 10.6.8 before downloading El Capitan from the App Store. 

Unfortunately, El Capitan will install directly onto your Mac. You will need to download it once more to get the installation package (installer). If you have Leopard (Mac OS 10.5) and would like to upgrade to El Capitan, you must first purchase and install OS X Snow Leopard. 

Remarks

This method creates a USB key called Install OS X El Capitan. The key contains an installer (installation package) named as Install OS X El Capitan. To perform an installation from the USB key, connect it to your Mac and then boot the key while holding the Alt key down. Boot from the USB key and then follow the onscreen procedure to install the new operating system. 

N.B. If at any point the installation procedure seems to stall, just let it be. Despite appearances, the installation procedure is likely just working slowly.

How to Prevent Safari from Opening Downloaded Files

Safari automatically opens downloaded files it considers as Safe. It may include compressed files, PDF, pictures, videos and other type of files downloaded from trusted sources. But what if a virus or malware was hidden in one of these so-called safe files? You might want to turn off this feature (enabled by default) for your own good. 

Method 1 - From Safari's settings

Launch Safari, click on the Safari menu > Preferences. Go to the General tab and clear the Open "safe" files after downloading checkbox. 

Method 2 - Using the terminal

Open a terminal and run the following command: defaults write com.apple.Safari AutoOpenSafeDownloads -boolean NO

iOS - How to copy a link from the address bar of Safari

Here's how to copy a link from the address of the Safari web browser on you iPhone or iPad. The procedure is simple and straight forward:
  • Open the Safari and go to the webpage of your choice.
  • Tap briefly on the link you want to copy > Select All


  • Tap on Copy.
  • That's it the URL has been copied to your clipboard.

To paste the link:
  • Tap briefly in any text field > Paste.

Adobe PDF Guide – Everything You Wanted to do with PDFs

Adobe PDF is probably the best format for sharing documents as the layout and formatting is preserved across all platforms, the documents are read-only and also because most computers and mobile devices can easily open PDF files.

This guide shares a host of useful things you can do with the PDF file format with the help of software tools and web apps that don’t cost a penny. You can edit PDF files (no Adobe Acrobat required), combine multiple PDFs as one, extract pages from PDFs and so much more. Let’s get started.

The Best PDF Tools & Apps

1. How do I create PDF documents without Adobe Acrobat?

You can use Google Chrome to print web pages as PDFs  without any extensions. Mac OS has PDF printing capabilities built-in while Windows users can install a virtual PDF printer like Nitro Reader to create PDF files from any Windows application using the regular Print command – just choose Nitro from the list of available printers.
SaveAsWWF from WWF is another PDF printer that creates printless PDFs. The other popular alternative is BullZip for Windows.

2. I don’t want to install any software. Are there any web apps for converting a bunch of documents to PDFs?

Sure. You can upload your documents to Google Drive and then export them as PDF files using these special links. Alternatively, you can email the documents toattachconvert@pdfconvert.me and perform the conversion by email. The latter options comes handy when you need to convert documents to PDFs on a mobile phone without any apps.

3. How do I convert a PDF file to another format like Word or HTML?

Upload the PDF document to zamzar.com and you’ll be able to the convert the file to other formats like doc, html, text, and more. Or you can use your Gmail account to convert PDF to HTML.

4. Someone sent me a PDF document in Chinese. How do I translate the PDF into English?

You can easily translate PDF files from one language to another using Google Translate. Go to translate.google.com, upload the PDF file, choose the destination language and hit the Translate button. The document text is translated though the formatting won’t be preserved.

5. How do I edit a PDF document?

PDF files are essentially read-only documents but there are workarounds to help you edit PDF files.

6. What is the easiest way to extract text from a scanned PDF document and use it in a Word document?

You can easily extract text from regular PDFs using the text selection tool in Adobe Reader but for scanned PDFs, Google Docs OCR is a good choice. Upload the scanned PDF document to Google Docs, select the option that says “Convert text from PDF and image files to Google documents” and then choose File – Download as Word to save the extracted text.
Alternatively, you can download FreeOCR, a Windows-only app for extracting text from PDFs.

7. How do I merge two or more PDF files into one? Can I also change the page order in the PDF?

You should use PDF Fill, a versatile PDF editing tool that lets you combine multiple PDF files into one. PDF Fill can also be used for rearranging pages of a PDF file or for rotating pages – a handy option for fixing the orientation of scanned PDFs. And if you prefer online apps, a good option is PDF Mergy.

8. I have a restricted PDF document that neither allows printing nor can I select text from the PDF. Can these restrictions be removed?

You can use online services like PDFUnlock.com or freemyPDF.com to remove all common restrictions around a PDF file – such as print, copying, etc. – without requiring any passwords.

9. Some PDF files on our intranet are password-protected and the employee who created those PDFs is no longer with the company. How can we open these PDFs?

There are several workarounds to help you open password protected PDFs. The PDF Unlocker app from AppNimi.com tries to guess passwords for your PDF using the Brute Force algorithm.
Alternatively, you can completely remove passwords from PDF files that are frequently viewed and instead place these files inside a password-protected folder of your computer.

10. How can I apply annotations or add text notes to my PDF documents?

You can use the free Adobe Reader app, available for both Mac and Windows, to annotate and comment inside PDF files. Go to the View menu and choose Annotations under the Comments menu. The toolbox has tools for highlighting text, you can add text blocks, create freehand drawings or even add sticky notes to the document.
Alternatively, use PDF Escape to add annotations, call-outs and text to your PDFs online in the browser without requiring any software.

11. How can I fill PDF forms online without Adobe Reader?

Go to PDF Filler, upload the PDF form and start typing. You can even pull PDF forms from your Dropbox or Google Drive.
PDF Filler will convert your PDF form into images and the user can type right on top of these images. When you have filled the form and are ready to print, the images and user text are combined into a single image. The other good option is FillanyPDF.com that is free as well.

12. How can I add watermarks or even my signature to a PDF document?

First draw your signature in Paint (or other photo editing tool) and save it as an image. Now open Adobe Reader and choose Tools – > Place Signature. Copy-paste that signature image anywhere on the PDF page. You can use the same technique to insert watermarks inside the PDF.
If you are on a Mac, open the PDF file inside the Preview app and choose Tools – Annotate – Signature – Create Signature from Facetime Camera. Sign your name in blank ink on a piece of white paper, hold the paper up to your webcam to scan the signature and you can then place it anywhere in the PDF.

13. I have a PDF ebook that contains 200+ pages. Is there a way to extract selected pages from the PDF and save it as another smaller PDF?

You can use the free PDF SAM (split and merge) utility to extract one or more pages from a PDF document and save them as separate PDFs. The tool, available for both Mac and Windows, can also be used to merge multiple PDFs into one file.

14. How can I protect my PDF documents with a password?

Upload the PDF file to pdfprotect.net, set a security password and export it as PDF again. The service can be used to password-protect files up to 10 MB in size.

15. How do I embed PDF files on my blog?

You have several options. Upload the PDF file to Google Docs and then embed it in your web pages using the Google Docs Viewer. Alternatively, upload the PDF to document hosting sites like Issuu, Scribd or SlideShare and use their Flash based viewer for embedding PDF into your web pages.

Bonus Tip – Manage your PDF collection

Did you know that you can upload all your PDF files to Google Play and read your PDFs in the web browser or any of your mobile devices. The Google Play Books app is available for both Android and iOS platforms and thus your collection always stays with you wherever you go!

How to Customize Your OS X Dock with Themes and More


OS X lacks little in aesthetic appeal, but sometimes you just want to change it up. Luckily, a free, open source application will let you tweak the Dock’s appearance to your heart’s content.
cDock is a tiny, no-nonsense app, which doesn’t need to be installed and can be used to change your Dock in myriad ways. Take a look at the following screenshot, and you can see there’s quite a few really useful options at your disposal.
For the most part, you’ll want to use cDock to apply themes that can radically or subtly change how your dock looks. cDock comes with many themes included, or you can create your own custom themes.
For example, you can make your Dock transparent, which lets you clearly see whatever is behind it.
Or, you can make it pink! There’s really no limit because cDock has a custom option, so you can change the appearance of your Dock to really anything you desire, you can even skin it with a picture.
Many of the features found on the cDock interface, are things you could already adjust but you also have other options, such as being able to lock Dock contents so they cannot be moved for removed.
You can also add app spacers, which are essentially blank tiles, allowing you to separate apps into groups.
Doc spacers, on the other hand, allow you to space out your stacks and running apps.
You can also add a recents folder, such as here with our Recent Applications stack.
Right-clicking (if you’re of the two-button mouse persuasion) reveals options to change that recents folder to one of five different types.
You might have noticed in the earlier screenshot, the option to show only running applications. This is just what it sounds like, whatever applications are running will be the only ones that appear in the Dock.
We imagine this might useful for restraining user focus to small set of applications, or you could use it as a sort of quasi-security feature, which doesn’t mean people can’t use Spotlight to launch apps but discourages them from casually launching other apps when they’re using your computer.
Finally, the other feature we want to point out is the colored Finder sidebar (Favorites) icons option. In OS X Mavericks and Yosemite, the Favorites sidebar has monochrome icons, which are simple, unassuming, and kind of drab.
If you want to change to colored sidebar icons though, you can then customize them to your heart’s content, which is especially nice versus the plain folder icons you see in the previous screenshot.
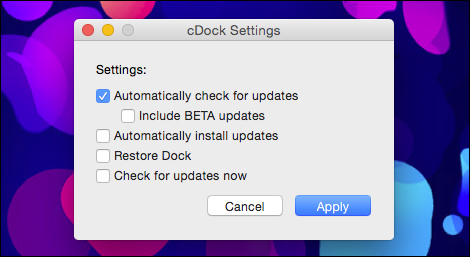
cDock has some settings, which you should be aware of, specifically the option to Restore Dock, so you can revert to your previous Dock configuration if you just want to start over. This won’t remove spacers and recents folders, but it will undo any change you made to the Dock’s overall appearance.
cDock isn’t complicated, but it does pack a lot of functionality into it. If you do decide to use it , even if it’s just occasionally, it’s good to know that once you select a change and hit “Apply,” you will have to keep relaunching the app to make further changes. It’s probably a good idea to either pin it to your Dock or keep the application package’s location accessible until you’re done making your tweaks.
Also, though cDock is up to version 6.1.1 (as of this writing), it’s still being developed, so make sure you’re always using the most recent version.
If you’re an OS X vet, then you already probably know some ways you can hack your Dock using terminal commands. The nice thing about cDock (other than being completely free), is that it eschews all that, allowing you change the Dock quickly and easily, without needing to know a thing about the command line.
We’ll be covering how to create custom Docks in an upcoming article, but in the meantime, feel free to play around with cDock on your own and see what you can come up with. And, as always, if you have anything you’d like to talk to us about, please make yourself heard in our discussion forum.

The Easiest Way to Hide Files and Folders on a Mac


Doing stuff on a Mac is supposed to be so easy and intuitive, that it’s surprising when something isn’t. There are several ways to “hide” stuff on a Mac, but only one of them really works well enough for us to recommend.
It’s not even about hiding stuff so others can’t see it. Sometimes you may simply want to hide something because you want to declutter your system. For example, if you move your Windows documents to the cloud, you will notice that many applications will often use your Documents folder for saving. Games too will often create their own folders in Documents.
The problem is that soon your Documents folder can become cluttered with all these new folders. If you’re using Windows, you can easily hide stuff using folder preferences.
With OS X, it isn’t so easy (every operating system has a way to do it), and it might not be such an issue for a lot of users, but eventually there may come a time when you can’t delete a folder or file, but you also don’t want to see it.

Command Line, Take Them Away!

To hide stuff on OS X, the best method is to use the Terminal, which can be accessed by either double-clicking it from Applications, or using Spotlight, which is ideally suited for launching apps that aren’t pinned to your Dock.
With our Terminal open, we use a single command and some dragging-and-dropping to hide whatever we want out of view.
Here’s our Documents folder on OneDrive as seen in OS X’s Finder.
You remember that earlier Windows screenshot? All we needed to do to clean up this folder was to hide everything we didn’t want to see with a simple right-click.
OS X doesn’t have that capability, and we can’t move these things because it might mess stuff up on our Windows machines because it’s synced to the cloud.
Returning to our Terminal window, we type the command “chflags hidden ” just like it is in the quotes. Make sure you add the space to the end; it’s important for what we’re about to do. Go the to the location where you want to hide stuff, hold down the “Command” key and click to select all the files and folders you want to hide. Once you’re finished, simply drag them into the Terminal window.
The command prompt will paste all the locations you just dragged behind the chflags command. Here’s an example of what that might look like. All you do now is hit “Return” and everything will disappear.
This saves you a ton of time and typing because you don’t have to enter in each location and file by hand, and you also can hide a bunch of stuff at once.
The end result is a much nicer and cleaner Documents folder, similar to what we created in Windows File Explorer.

Undoing What You Just Did

Undoing all this isn’t quite as easy, because when you open your folder, the stuff you have hidden won’t show. Again, in File Explorer, it’s a great deal easier to show hidden items.
Nevertheless, open your OS X Terminal again, but this time navigate to the root folder where all your hidden stuff resides. In our example, it’s in our Documents folder, which is on our OneDrive.
We use the change directory (cd) command where, after “cd” you’d insert the path where you want to go. Again, you don’t have to type the path, you can simply drag the location over to Terminal. Just remember to add the space after “cd. ”
Once you’ve changed directories, type the “ls” command to list everything in the directory, and then use the “chflags nohidden” command. Stuff with spaces between words is denoted with a “\” such as “Microsoft\ Hardware” or “Custom\ Office\ Templates.”
If you’ve ever used the Terminal, then you might know you don’t have to retype commands over and over. You can actually recycle command by using the up and down arrow keys. This is really convenient if you have a command or commands you need to execute over and over, but don’t want to type and type and type.
So, there you have it, hiding and unhiding folders and files in OS X. While it’s not exactly the most elegant method, it gets the job done.
Have another method or tips you would like share with us? Please, talk to us in our discussion forum.