Showing posts with label Windows. Show all posts

Get Windows 10 for Free After July 29th, with a Little Prep Now


Microsoft has confirmed that Windows 10’s free upgrade offer will expire on July 29, 2016. After that, you’ll have to pay $119 to upgrade on any computer that hasn’t already made the leap. But with a few simple steps, you can “reserve” that free copy now, so you can upgrade after July 29 without paying.
We know not everyone wants to upgrade to Windows 10 right now, and that’s fine. But one day, you’ll probably have to. And you don’t want to have to pay $119 for it. By upgrading a computer now and then rolling back to Windows 7 or 8, you’ll get to keep your original version of Windows, but “reserve” that free Windows 10 license for all your PCs.

How This Works

When you upgrade to Windows 10 from a PC running a genuine and activated Windows 7 or Windows 8.1 operating system, your PC receives a “digital entitlement.” Basically, Microsoft notes on its servers that your particular PC’s hardware is eligible for Windows 10 going forward.
Once your PC is eligible, it’s always eligible–you can reinstall Windows 10 from scratch and it’ll automatically activate, without you even entering a product key. You can even install a different operating system–like Windows 7 or Linux–and reinstall Windows 10 later, fully activated and genuine.
Note that this is tied to your computer’s specific hardware, not your Microsoft account. The free Windows 10 license you receive will only work on that PC–if you upgrade the motherboard or try to install Windows 10 on another PC that doesn’t have the digital entitlement, it won’t work.
So, in order to “reserve” Windows 10, we’re going to walk you through the steps of upgrading to Windows 10 on your machine, then reverting to Windows 7 or 8. You get to keep the version of Windows you love, but your PC will be entitled to Windows 10 at any point in the future, without having to pay $119.
We’ll walk you through two methods: A simple method that involves upgrading and rolling back, and a slightly more complex method that involves cloning your current disk, so everything isexactly how you left it.

The Easy (But Imperfect) Method: Upgrade and Roll Back

The easiest way to do this is use the “roll back” feature to uninstall Windows 10 and get your old Windows 7 or Windows 8.1 system back. However, this may not always work perfectly. Some programs may be removed during the upgrade and you may have to reinstall them afterwards, for example. If you want to be extra sure everything stays exactly as you left it, head to the next section for the slightly more complicated option.
However, if you’d like to live dangerously (and don’t want to waste much time), the upgrade and roll back method is simple. First, download the Windows 10 upgrade tool, run it, and agree to upgrade your PC to Windows 10.
After Windows 10 is installed, click the “Start” button and select “Settings.” Navigate to Update & Security > Activation. Ensure it says “Windows 10 on this device is activated with a digital entitlement.” If it does, your PC is registered with Microsoft and you can install Windows 10 on it whenever you like. You may need to wait a while for Windows to contact the activation servers.
Once your activation looks good, go to the Recovery tab and click the “Get started” button under “Go back to Windows 7” or “Go back to Windows 8.1.”
Windows 10 will automatically uninstall itself and restore your old Windows system to your hard drive. Congratulations! You’re now back to Windows 7 or 8, but are eligible to upgrade to Windows 10 for free, even after the July cutoff date.

The Complicated (But More Exact) Method: Image and Restore Your System Drive

For maximum safety, you’ll want to create an image your Windows 7 or 8.1 system drive before upgrading. Then, after upgrading, you can restore that cloned image to your computer, ensuring you’ll get your system in the exact state it was in before.
You’ll need an extra hard drive to accomplish this, at least as big as the one in your computer. (Alternatively, you can use several discs, but that could take a very long time.)
You’ll also need a third-party tool to image your drive. We recommend Macrium Reflect for this. So download and install the free version on this page and launch it. You’ll be prompted to create rescue media, which you can use to restore your backup image later. If you aren’t, click Other Tasks > Create Rescue Media. Go through the wizard, selecting the default options and then choosing the device you want to use for your boot media. You can either create a bootable USB stick or burn this rescue media to a disc.
Next, in the main Macrium Reflect window, click the “Create an image of the partition(s) required to backup and restore Windows” option in the sidebar. On the Disk Image window that pops up, make sure the entire disk is checked under “Source”–you don’t want to miss any of those partitions. Under Destination, choose your spare hard drive as the “Folder”.
Click “Next” to go through the wizard, ignoring all the advanced settings about templates and scheduling. Click “Finish” at the end of the wizard and then wait for Macrium Reflect to image your drive.
When Macrium Reflect is done cloning your drive, download and run the Windows 10 upgrade tool. Allow it to upgrade your PC to Windows 10. This may take a while, so give it time.
Once the upgrade finishes, your computer should, in theory, be permanently eligible for Windows 10.
To make sure, click the “Start” button in Windows 10 and select “Settings.” Navigate to Update & Security > Activation. Ensure it says “Windows 10 on this device is activated with a digital entitlement.” If it does, your PC is registered with Microsoft and you can install Windows 10 on it whenever you like. You may need to wait a while for Windows to contact the activation servers.
All good? Good. Now it’s time to roll back to your old setup.
Boot your computer from that Macrium Reflect recovery drive we created during the initial setup. You can do this by entering the boot menu when your computer starts, or changing your computer’s boot drive order.
Once in the recovery tool, connect the external drive you backed up to. Select the “Restore” tab and use the “Browse for an image file” option to select the image you created earlier. Click “Restore Image” to restore the cloned image back to your computer.
Now, carefully select the system drive you imaged earlier–the original one you had Windows installed on. If your computer has multiple disks, be sure you’re restoring the image back to the same drive you originally cloned. If you don’t, you could lose data!
Use the “Copy selected partitions” option to copy the partitions from your image back to the disk. Finally, click “Next” and finish going through the wizard. Macrium Reflect will restore your image, overwriting Windows 10 with your original Windows installation.


The Clean Slate Option: Upgrade to Windows 10, then Reinstall 7 or 8


If you don’t mind reinstalling Windows fresh and losing everything on your computer, you can always upgrade to Windows 10, then do a fresh install of Windows 7 or 8 afterward. Be sure you have backups of your important files before doing this!
Just download and run the Windows 10 upgrade tool and let it upgrade your PC. After you’re done, download Windows 7 or 8.1 installation media from Microsoft’s website, place it on a USB flash drive or DVD, and boot from it. Go through the normal process of reinstalling Windows and wipe your hard drive, replacing Windows 10 with the older version of Windows.
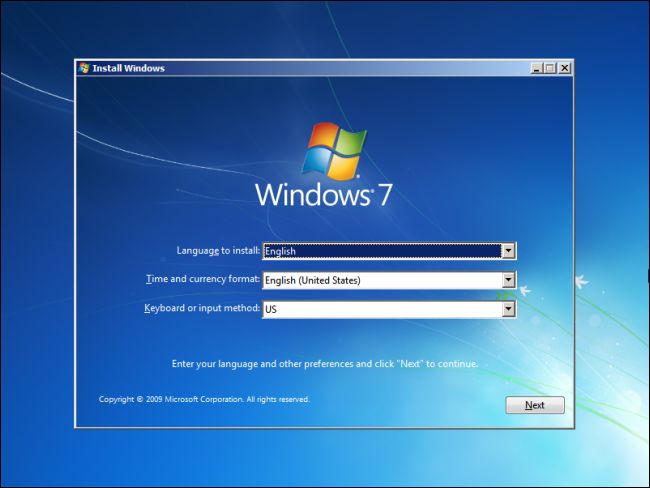
You’ll need a valid Windows product key for this. The Windows product key that came with your computer should usually work, but Microsoft doesn’t guarantee that “OEM” or “Original Equipment Manufacturer” keys can always be used to reinstall Windows. (If you run into errors, try activating it with Microsoft over the phone–that often works.)

How to Uninstall Windows 10 and Downgrade to Windows 7 or 8.1


Don’t like Windows 10? As long as you’ve upgraded within the last month, you can uninstall Windows 10 and downgrade your PC back to its original Windows 7 or Windows 8.1 operating system. You can always upgrade to Windows 10 again later.
Even if it’s been more than a month, you should be able to reinstall the version of Windows that came with your PC using fresh installation media and its product key.

Go Back to Windows 7 or 8.1


If you’ve upgraded a PC to Windows 10 — not performed a clean install, but an upgrade — you’ll have an easy option that lets you revert to the last version of Windows. To access this, open the Start menu and select Settings. Click the “Update & security” icon and select “Recovery.”
You should see a “Go back to Windows 7” or “Go back to Windows 8.1” option. Click the Get started button to get rid of your Windows 10 install and restore your previous Windows install. Microsoft will ask you why you want to go back.
If it’s been over a month — or if you’ve run the DIsk cleanup tool and removed the “Previous Windows installations” files or deleted the C:\Windows.old folder by hand — you’ll no longer see this option. Windows 10 appears to automatically remove the old Windows installation files after a month to free up space.


This Uses the Windows.old Folder


This works because Windows 10 stores your old Windows installation in the folder named “C:\Windows.old” on your computer. You can see this folder in File Explorer, though you shouldn’t attempt to delete it from here. You can also browse the Windows.old folder and restore files from it.


Obviously, storing every single file from your old Windows installation takes a lot of space. If you open the Disk Cleanup application, you’ll see just how much space it uses. Click the Start button, type “Disk cleanup” to search for it, launch it, and click the “Clean up system files” button.
Find ‘Previous Windows installation(s)” in the list, and you’ll see just how much space it’s consuming on your hard drive. If you’re sure you don’t want to go back to your previous version of Windows, use Disk Cleanup tool to remove those files and immediately free up space.


How to Downgrade if Windows 10 Doesn’t Give You The Option


Assuming you have an old computer you upgraded to Windows 10, that computer previously had Windows 7 or 8.1 on it. That means that computer came with a product key that allows you to use Windows 7 or 8.1 on it. To get back to an older version of Windows, you’ll have to perform a clean install of Windows — something PC geeks often do on new computers, anyway.
Thankfully, Microsoft now offers easy downloads for Windows 7 and 8.1 ISO files. Download the Windows installation media and burn the ISO file to a disc or copy it to a USB drive using Microsoft’s Windows USB/DVD download tool. You can then boot from it and reinstall Windows 7 or 8.1 fresh, telling it to overwrite the Windows 10 system already on your hard drive. Be sure you have backup copies of all your important files from your Windows 10 PC first.
You’ll have to find your PC’s product key if you do this. On a Windows 7 PC, examine your PC for a “certificate of authenticity” sticker with a key on it. They sticker may be on the underside of your laptop, in the battery compartment under a removable battery, or even on a laptop’s power brick. On a Windows 8 PC, you may not have to do this at all — the key may be embedded in your computer’s firmware and Windows 8.1 will automatically detect it and allow you to reinstall Windows 8.1 without even asking you to enter a key.
If you bought a new PC that came with Windows 10 and you want to go back to a previous version of Windows, that’s tougher. To do this legitimately, you’ll need to purchase a Windows 7 or 8.1 license and install it from scratch, entering the product key you purchased during the install process.
If an important program or hardware device you use doesn’t work on Windows 10, you’ll want to downgrade. If Windows 10 just seems unstable, you’ll want to go back to your previous version of Windows and wait a while longer before attempting an upgrade. Or, if you’d just rather hang onto Windows 7 for a while longer, you can downgrade.
Windows 10 will remain a free upgrade for the first year, after all.

How to Find Your Lost Windows or Office Product Keys


If you’re planning on doing a reinstall of Windows but can’t find your product key, you’re in luck because it’s stored in the Windows Registry… it’s just not easy to find, and it’s impossible to read without some help. Luckily, we’re here to help.
As you can see in the screenshot above, the product ID is stored in the registry but is in a binary format that can’t be read by humans unless you are some sort of Cylon. You aren’t, are you?
We’re not really sure why Microsoft went to great lengths to make it difficult to see the product keys for their software, especially since they are stored right in there in the registry and can be read by software, if not by humans. We can only assume that they don’t want anybody to re-use a key from an old computer.
The great thing is that you can even recover a key from a computer that won’t boot anymore. All you need is access to the disk drive from a working computer. Keep reading for more.
Note: the NirSoft keyfinder won’t always work for OEM computers, depending on how they decided to activate the licenses they might have used a single license for all computers. It also doesn’t work for Office 2013.

Three Places You Might Find the Key


The key you need will be in one of three places:
  • Stored in software on your PC: When you (or your PC manufacturer) installs Windows, Windows stores its product key in the registry. You can extract this product key, and — often — enter it when reinstalling Windows on your PC. Crucially, you’ll need to grab it from your operating system before you begin reinstalling Windows or it could be deleted if you format your hard drive.
  • Printed on a sticker: Some PCs use a technology called “System Locked Pre-installation,” or SLP. If your PC uses this, the product key on your PC — the one stored in the registry, and the one key-viewer applications display — will be different from the actual key your PC needs. The actual key is on a certificate of authenticity (COA) sticker on your PC or its power supply. The one in the registry and key-viewer application is a red herring. This system was common for Windows 7 PCs.
  • Embedded in your PC’s UEFI firmware: Many newer PCs that come with Windows 8 use a new method. The key for the version of Windows the PC comes with is stored in the computer’s UEFI firmware or BIOS. You don’t even need to know it — assuming you’re installing the same edition of Windows the PC came with, it should automatically activate and work without you needing to enter a key. It’ll all happen automatically.
Be sure to use the same version and edition of Windows the computer came with. In other words, if it came with Windows 7 Home Premium, you can’t install Windows 7 Professional.

Finding the Windows Key Without Any Software (Advanced Users Only)

Assuming you can boot your computer without any problems, you can easily create a simple VBscript that will read the value out of the registry and then translate it into the format that you need for reinstalling. I'm not sure where this script came from, but i found it on a forum a long time ago, so i'm sharing it here for you.
Copy and paste the following into a Notepad window:
Set WshShell = CreateObject("WScript.Shell")
MsgBox ConvertToKey(WshShell.RegRead("HKLM\SOFTWARE\Microsoft\Windows NT\CurrentVersion\DigitalProductId"))

Function ConvertToKey(Key)
Const KeyOffset = 52
i = 28
Chars = "BCDFGHJKMPQRTVWXY2346789"
Do
Cur = 0
x = 14
Do
Cur = Cur * 256
Cur = Key(x + KeyOffset) + Cur
Key(x + KeyOffset) = (Cur \ 24) And 255
Cur = Cur Mod 24
x = x -1
Loop While x >= 0
i = i -1
KeyOutput = Mid(Chars, Cur + 1, 1) & KeyOutput
If (((29 - i) Mod 6) = 0) And (i <> -1) Then
i = i -1
KeyOutput = "-" & KeyOutput
End If
Loop While i >= 0
ConvertToKey = KeyOutput
End Function
You’ll need to use File -> Save As, change the “Save as type” to “All Files” and then name it productkey.vbs or something similar ending with the vbs extension. We’d recommend saving to the desktop for easy access.
Once you’ve saved it, you can just double-click and the popup window will show you your product key.

Protip: If you use CTRL + C when the popup window is active, it will copy the contents of the window to the clipboard, and then you can paste it into Notepad or somewhere else.

Use NirSoft’s ProduKey to Recover Product Keys (Even if You Can’t Boot the PC)

The easiest way to get access to your product key is with a third-party utility, and there’s nobody better at those than NirSoft. Their utilities are always crapware-free, and are always really useful. The only issue with this particular utility is that some antivirus will detect it as a false positive, because some malware might try to steal your product key.
Note: if your OEM installed your computer and used a single key for all their PCs, this key might not actually work to reinstall your computer. Keep reading for more information.
All you have to do is download ProduKey, unzip it, and then run it to immediately see all of your product keys. It’s as simple as that.
If you want to recover a key from a dead computer, you can hook up the hard drive to a working PC, and then run ProduKey and use File -> Select Source to point to the external Windows directory. You can then grab the keys from that computer easily.
You can also use a Linux live CD to pull the Windows directory off the other computer and onto a thumb drive, or just grab the registry files if you prefer.

Read the Key From the COA Sticker

So, is that product key usable for reinstalling Windows on your PC? If you have a Windows 7-era PC, there’s a good chance the PC’s key is a single key the manufacturer uses for all their PCs. Thanks to “System Locked Pre-installation,” you’re not allowed to use that key to install Windows. If you try, you’ll get error messages about the key being invalid.
To check, you’ll need to look for a certificate of authenticity sticker on your computer. The COA sticker verifies that the computer came with an authentic copy of Windows, and that sticker has a product key printed on it. You’ll need that product key to reinstall Windows — and, if the manufacturer used System Locked Pre-installation, that key is different from the one your PC came with in software.
Examine your computer to find the key. On a laptop, it may be on the bottom of the laptop. If your laptop has a removable battery, it may be under the battery. If there’s some sort of compartment you can open, it might be in there. It may even be stuck to the laptop’s charger brick. If it’s a desktop, look on the side of the desktop’s case. If it’s not there, check the top, back, bottom, and anywhere else it might be.
If the key has rubbed off of the sticker, there’s not much you can do. You can try contacting your computer’s manufacturer and explaining what happened, but we can’t guarantee they’ll help. Microsoft would always be happy to sell you another key, though!

Windows - How To Recover A Lost Password with Ubuntu

You no longer remember the password of your Windows session? Need to unlock a password-protected PC? The following tutorial describes a simple, yet effective method of changing your current Windows password that will help you regain access to your session. 

This tip is valid for Windows XP, Vista, 7 and Windows 8 users. 

How To Reset Your Password in Ubuntu


Download and Burn Ubuntu onto a CD/DVD

The first step is to download and burn the Ubuntu disk image onto a CD or DVD. 

Boot from CD/DVD Drive

Insert the Ubuntu installation CD/DVD and start your computer. During startup, press Delete,F1 or F2 to access the BIOS. Once the BIOS setup utility opens, go to the Boot tab > Boot Device Priority

Drag the CD/DVD drive to the top of the list, and tap on F10 to save your settings. Press on Y (Yes) to confirm, and press Enter

Install chntpw

Once Ubuntu starts up, select your language settings, and click Try Ubuntu. Go to System >Administration > Synaptic Package Manager to open the package manager. Next, go toSettings > Repositories. Go to the Ubuntu Software tab > Downloadable from the Internetand tick the Community-maintained Open Source software - (universe) checkbox. Close theSettings menu. 

Click on the Reload button to update the packages. You will see a field called Quick Searchdisplayed at the top right. Type chntpw into the search box, and press Enter. The package will then be displayed. Click on the little star displayed on the left side of the package name, and selectMark to Install > Apply

Identify the System Drive

The next step is to locate the drive on which Windows is installed. 

Go to My Computer and search for the drive containing the Windows folder. Note the references of the selected drive. 

Delete Your Current Password

Go to Applications > Accessories > Terminal. Enter the following commands: 

cd /media
, followed by the Enter key. 
ls
, followed by the Enter key. 

A list of your hard disk drives will be displayed. Locate the system drive, and type cd xxxx . PressEnter. (Replace xxxx by the reference of the system drive). 

Next, type cd WINDOWS/system32/config and press Enter to move to the file that contains your passwords. 

Type sudo chntpw SAM -i, followed by Enter. Type 1 and then press Enter

A table with the names of all Windows users will be displayed. Move the RID column to retrieve the code for the desired user account. 

Type 0x followed by RID code of the user before and confirm with Enter

Type 1 and press Enter to erase the password for selected user. Once the operation has been carried out, press Enter to exit. 

Type Q to save all changes, followed by Enter to validate. 

Close all windows and restart your computer. Don't forget to remove the Ubuntu installation disk. 

You can now access your Windows session without any password requirement.

Add keyboard language on windows 10

Hello everyone !! ))
Today i will show you how to add a keyboard language on windows 10
Lets start!!
Go to Settings - Time& & Language - Region Language


How to switch on/of tablet mode on windows 10

In this video i will show you how to switch on/off tablet mode on windows 10


Switchable Graphics Cards on Windows 10

Some laptops come equipped with dual graphics cards, namely a high-performance standalone one (also known as a discrete graphics card) to run graphic intensive programs, and an integrated graphics chip built into to the motherboard. 

Integrated graphics cards are usually sufficient when it comes to running your OS (desktop), and performing basic tasks such as web browsing, video playback and document editing. However, in order to run games or graphic-intensive programs such as video editing, 3D animation, and CAD software, it is recommended that you switch to the discrete graphics card. This process is usually done by your operating system, but Windows 10 also allows you to launch program with the graphics card of your choice. 

The actual procedure of changing your graphics card is very easy. Simply right-click on the program shortcut > Run with graphics processor. You may then click on your desired option to designate the correct graphics card: 


Windows 10 - How to Change Cortana's Default Search Engine

The fact that Windows 10 doesn't provide any built-in option to change default search engine of Cortana led many people into thinking that the intelligent personal assistant works exclusively with Bing. Want to change the default search engine of Cortana or Windows Search? There exist a simple workaround that involves using Google Chrome or Firefox.


Prerequisites

- Donwload and install Google Chrome or Firefox
- Set Google Chrome or Firefox as your default web browser. 

Set your default web browser

Click on Start > Settings > System > Default apps > Web browser


Choose your default web browser. 

Change Cortana's default search engine with Firefox

Open Firefox, click on the Menu button > Options. Go to the Search section, select your default search engine (e.g. Google) and then tick the Use this search engine for searches from Windows checkbox:


Close the Options menu and try to make a web search with Cortana. 

Change Cortana's default search engine with Google Chrome

Open Google Chrome and then install the Bing2google extension from this link. Once installed, all your web searches made with Cortana or Windows Search will be redirected to Google.com: 


Want to redirect Bing searches to search engines other than Google? Get the Chrometana extension instead; It allows you to use the search engine of your selection.